Paul’s Missionary Journeys
You will need Google Earth to do this activity (download it free).
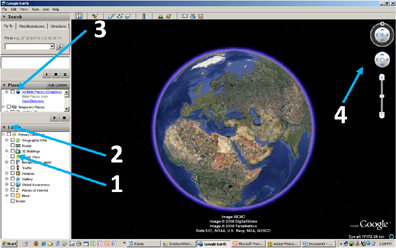
(b) Un-check all boxes in the Layers panel (1). You may wish to minimize the layers panel (2). Click to un-check “All Bible Places” in Places panel (3). Click on plus mark next to “All Bible Places (Chapters)” (3).
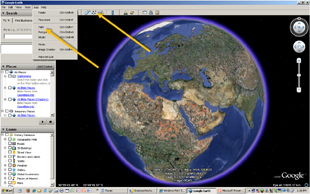
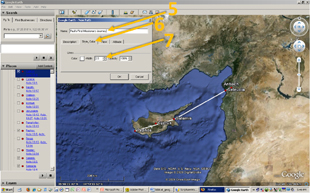
(c) Click the plus next to Acts and put a check in the boxes next to Acts 13 and 14. From the drop-down “Add” menu at the top of the screen select “Path” -- alternately, use the “Add Path” icon on the upper toolbar (see illustration on left, below). In the pop-up window type “Paul’s First Missionary Journey outbound,” or the like (5), click on the “Style, Color” tab (6), and adjust the width of the line as you see fit (7). Read Acts 13-14 and click on each place Paul and Barnabas visited, in order, stretching the line to connect all of the places and show the travel sequence. Double click on the last outbound location to end the connected lines. Next, “Add” another “Path” of a different color to mark their return trip, double-clicking when they arrive back at Antioch. Save your work as explained in the next point, before moving on to the Second and Third Missionary Journeys.
 |  |
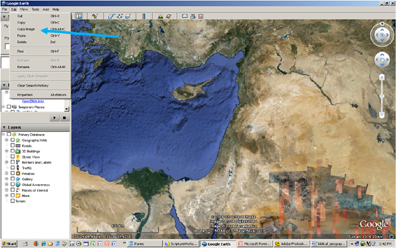
(d) If you wish to save your work, click “Edit” drop-down menu on the upper toolbar, and click “Copy Image.” Next, open an image editing program and paste the image (like Pp).
(e) Clear the lines and uncheck the boxes. Repeat the preceding directions for Paul’s Second (Acts 16:11-18:22) and Third Missionary Journeys (Acts 18:23-21:19).
Copyright © 2009 ScriptureWorkshop.com
Return to The Biblical Geography Workshop